Vistas:102 Autor:Editor del sitio Hora de publicación: 2019-09-06 Origen:Sitio
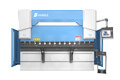
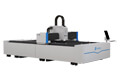
Let me introduce the composition of the CNC plasma cutting machine (picture 1)
")
Picture 1
The system cannot be powered
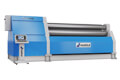
1.The line breaker CB1(Picture 2)behind the power supply is loose and secure it.
")
Picture 2
2.The fuse on the switchboard PCB1 (Picture 3) is broken. After the power is applied, PCB1 all three LED light will illuminate. If one of the three LED light is off, replace the fuse which connected to the LED.
")
Picture 3
No arc on the torch
Find the TB3 on the right side of the back of the power supply and place a push button switch between the wires 82 and 83 of the TB3. Power the system and close the switch. If the torch is ignited, then the problem is the machine interface cable or CNC.
Lost arc / no transfer
After the torch is ignited, the arc is extinguished, find the TB3 (Picture 4) on the right side of the back of the power supply, and put a push button switch between the wires 82 and 83 of the TB3 for program cutting. After the arc is stabilized, turn on the button switch. The switch will bypass the plasma start signal. If the torch continues to cut, the problem is machine interface cable or CNC.
")
Picture 4
Short lifetime of consumables
1. Side of the nozzle hole is corroded, the electrode life is short, and the tip of the electrode becomes black.
①The system may leak and perform a leak check.
②There is leakage inside the torch. The pre-flow is cleaned for 30 s, the cutting gas is cleaned for 30s, and then the switch turn operation mode. Leave the system idle for 15min, lower the torch to 1/2 inch (12 mm) below the plate and place a mirror under the torch. The pre-flow was cleaned for 30s and the cutting gas was purged for 30s. If moisture begins to deposit on the mirror, there is a coolant leak in the torch. Check the torch body and the o-ring of all connectors on the back of the torch.
2. outer hole of the nozzle is a taper hole
① The guide arc line and work piece short circuit , and the resistance of the guide arc line to the ground or working lead line must be reach 1000 Ω or more higher.
② The guide arc relay CR1(Picture 5)connect point was welded, find guide arc relay on the center layer. When igniting the torch against the metal. Once the arc line is transferred to the board, the relay should be turned on.
③Working lead connection failure, working lead and working lead connection failure will prolong the guide arc ignition time and increase the abrasion of the spray group. To determine whether the guide arc is not transferred to the sheet immediately, you can look at the green LED on the start line (PCB14) while igniting the torch against the metal. If the LED is on, it should only flash. If the LED light is on for more than 0.5s, the arc won’t transfer to the board immediately.
")
Picture 5
④ The power supply output current is higher than the set current. Check the output current on the analog board PCB3 (Picture 6) CS5. If the actual output current is higher than the set output current, check the output current of each chopper.
")
Picture 6
⑤ Torch head short-circuit and replace the torch。
Low cut quality
1.The cutting surface is at a positive and negative angle, and the torch is not perpendicular to the plate, it needs calibration.
2.All cutting surfaces have excessive positive bevels
① The distance from the torch to the workpiece is too large, and the arc voltage setting is reduced by 5 or 10V.
② gas leakage, check for leaks.
③ travel speed is too fast, reducing speed.
④ The gas setting is incorrect, the gas source is insufficient, and the gas pressure setting is lower than the rated value.
All cutting faces have a large negative bevel; the torch is too close to the workpiece, and increase arc voltage 5 or 10V.
Torch body coolant leak
The torch is not properly placed in the torch holder
1.The O-ring (Picture 7) on the central pipe behind the torch is not properly fixed. If the torch is not fully screwed onto the torch holder, the O-ring behind the torch body will not seal well and cool after power-on. As a result, the force of the coolant leaking around the central duct of the torch will cause the O-ring to move.
")
Picture 7
One of the coolant connections on the back of the cutting torch (Picture 8) is damaged. Check whether the o-ring on the back of the cutting torch is damaged.
")
Picture 8

 Español
 Pусский